
Making simple animated .gif emotes with Blender
In this post, I am going to show you how to make simple emote/emoji animations in Blender for newbies. You will learn, for example, how to animate the eyes of emotes or how to add simple effects, like squishing it.
Generally, there are two ways to animate:
- Draw every frame of the animation separately. This is time consuming, but sometimes necessary if you want to do complex animations that change the outline significantly.
- Use interpolation to animate properties of objects. For example, you simply define two positions of an object, and let Blender interpolate between those two in several frames, so it moves fluently. It’s especially useful for animating things that would be very tedious to do manually, like adding confetti to the background. Moreover, since Blender is also 3D, it’s a good tool for animating 3D transformations, like spinning a character around.
This tutorial teaches you the basics for the second option. You need:
- Krita (4.2+), for creating the individual parts of the emote
- Blender (3.3+), for creating and rendering the animation
- Gimp (2.10+), to make a
.gifout of rendered images.
All the tools are free and open source, which is ideal for beginners. Previous versions of the software might work too.
Table of Contents
- Krita
- Blender
- Gimp
Krita
Before we can animate, we need to paint the parts necessary for creating the emote. Every drawing software will do, but I recommend Krita.
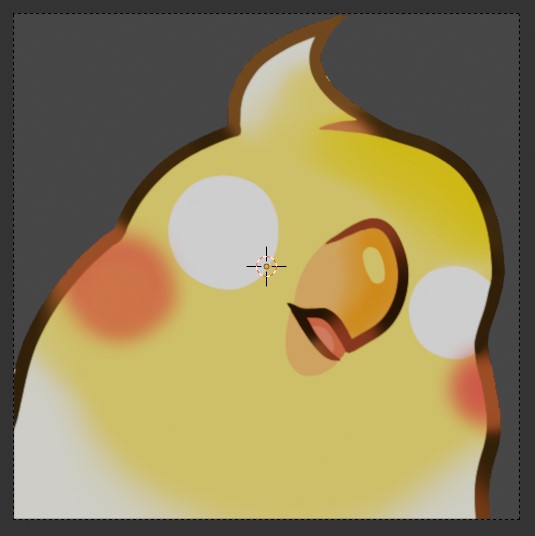
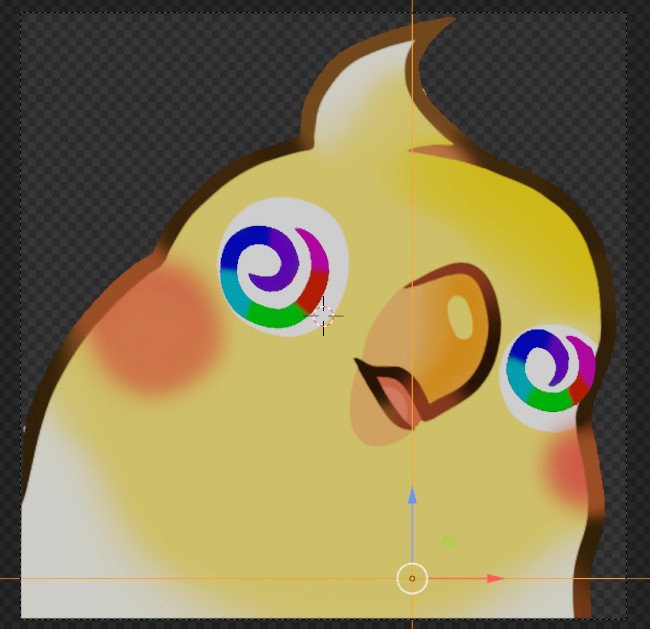
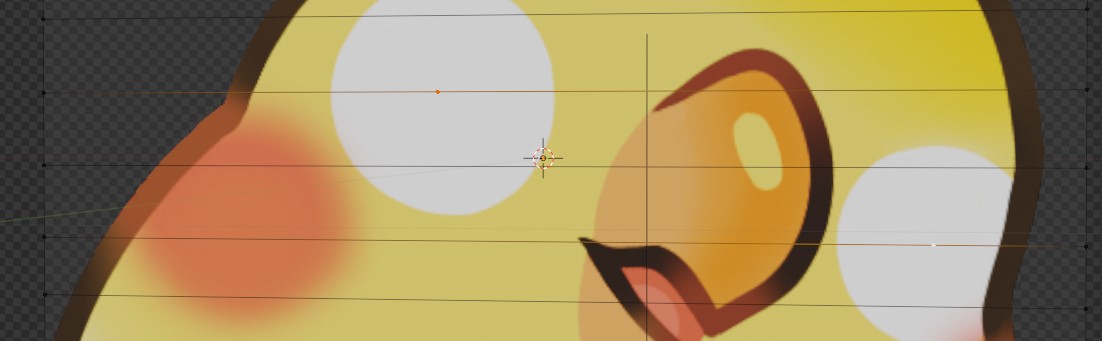
For this tutorial, I am going to animate the following emote:

It’s from the Twitch channel Phenexa. Check her out and tell her to play Frostpunk and This War of Mine, as well as Half-Life 2 Episode 1 and 2 (she still doesn’t know…).
To properly prepare the emote for animating it, we need to:
- Extract all the parts we want to animate. For example, if we want to make the eyes rotate (or blink), we need to create a separate picture/file for each eye.
- Make sure the resolution of every picture is a factor/divisor of the main background image. For example, if your background image is 500x500 pixels, you want smaller parts like the eyes 100x100 pixels (one fifth). This will make importing them into Blender much easier.
- Fill in any empty spots. If you extracted the eyes, for example, you don’t want a hole in the background where the eyes used to be.
After doing the steps, it results in something like this:
- Background (main bird)

- Eye Left

- Eye Right
- Question mark

With those pictures, we can animate the background, the eyes, and add some question marks for extra spice. Notice how the background is the initial picture but without all the parts we are going to animate. Also notice how each picture is a multiple of the background, e.g. 100x100 for the eyes.
Blender
Using Blender
Now that we have prepared the necessary parts for our animated emote, we need to import them into Blender. If you start a new Blender project, your screen will look similar to this one:
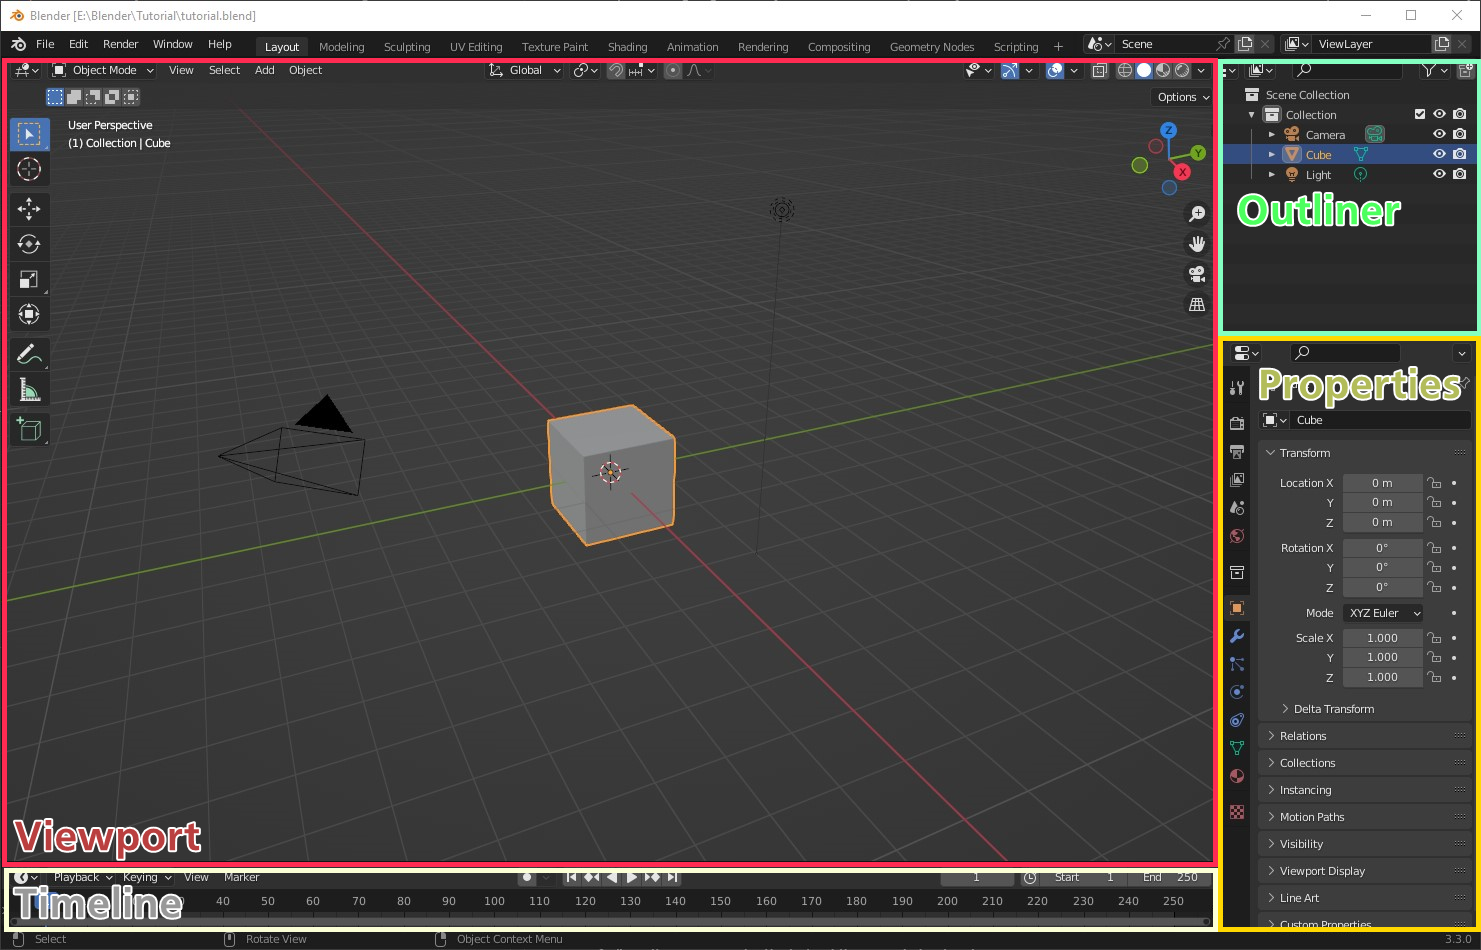
We see four areas:
- The viewport, for looking at the scene
- The outliner, showing all the objects in the scene
- The properties, for setting up the scene and objects
- The timeline, for playing the animation
If you don’t have the same areas, you can change the type of area by clicking on the little icon on the top left of each area. You can also create new panels by right clicking between two areas and splitting them. To remove an area, right click on the top toolbar of the area and select Close Area.
Most of our work is done in the viewport. The top left corner has the current mode of operation (defaults to Object Mode) as well as the tool menus. The left side shows the tools, which depend on the mode of operation. The top center has settings for transformations (make sure snap and proportional editing are off), and the top right corner has settings for the viewport itself, like whether to show overlays like the grid, or what shading to use in the viewport. Furthermore, we have viewport camera operations directly below that.
Movement in the viewport always depends on which object is currently selected. The camera gizmo with the three axes can be used to rotate the view around the object, or change the view as if you were looking directly through the axis.
We can zoom the view, pan the view, look through the render camera, and change between perspective and orthographic mode with the four buttons.

The outliner gives us options for hiding objects in the viewport (eye symbol) or in the render (camera symbol).
As the name says, the properties allow us to change specific settings of objects or the scene. It is context sensitive and depends on the currently selected object. You can select objects by clicking on them in the viewport or the outliner.
Some useful keyboard shortcuts:
Middle Mouse Buttonallows us to rotate the view around.Shift+Middle Mouse Buttonallows us to pan the view.Ctrl+Middle Mouse Buttonallows us to zoom the view.Numpad ,focuses the viewport on the currently selected object.Numpad 0to look through the camera.
Setup Blender
First, we add a dope sheet area. Select the space between the timeline and viewport, press Right Click > Split Horizontal. Select the button on the very top left of one of the areas, and change it to Dope Sheet.
To import the graphics into Blender, we can make our life much easier by enabling an add-on. Go to the top bar, select Edit > Preferences > Add-ons, and search for “plane”. You should get one result in the list called Import-Export: Import images as planes. Enable this one.
You might also want to change the number of maximum undo steps, which is useful for trial and error. Go to the System preferences, and increase the maximum of undo steps to a limit of your liking. You might also want to add a memory limit, depending on the amount of RAM in your PC.
Furthermore, we need to prepare the scene:
- Delete the cube (Select and
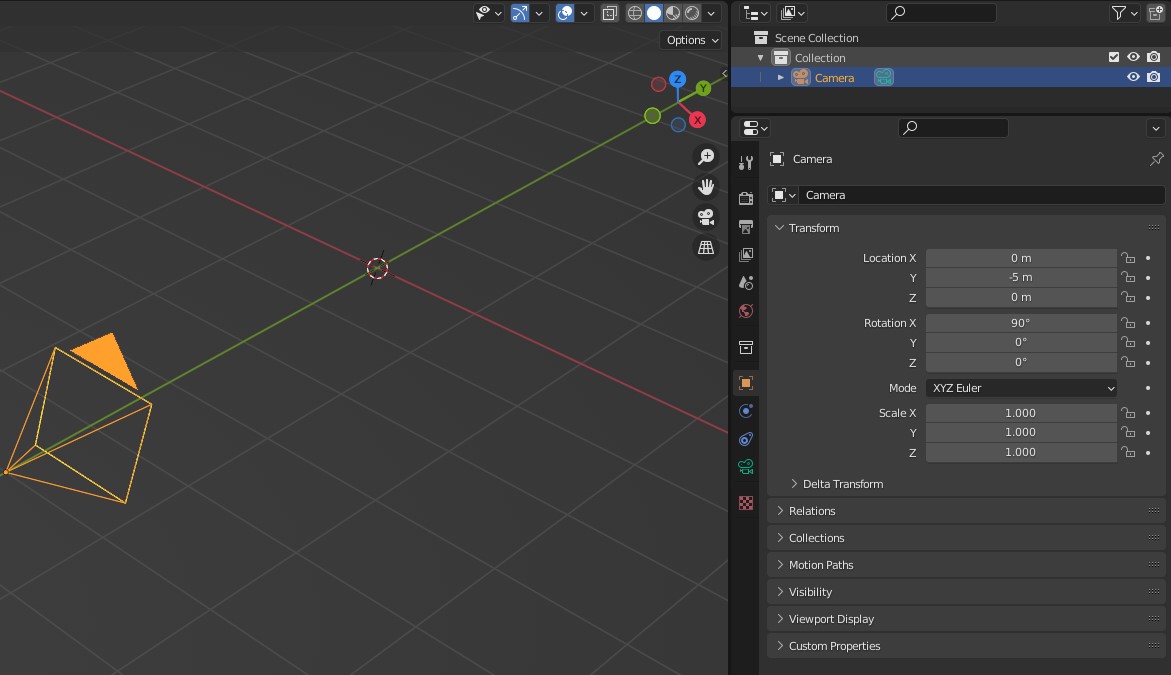
Deletekey) and delete the light. - Select the camera, go to the properties area, then transform, and set the location to (0m, -5m, 0m) and the rotation to (90°, 0°, 0°).
- Click on the object data properties while still having the camera selected. Change the type to orthographic, since we will create a 2D picture, and the orthographic scale to 1.
- Click on the output properties, and set the resolution to 500x500 pixels, or whatever the size of your background image will be.
- The frame rate can be kept at the default value, since we can change that later in Gimp. You can also select the frame range. Don’t put it too high, since each frame increases the file size. For simple emotes, I recommend somewhere around 40 to 60 frames. Our emote will be 50 frames.
Your scene camera view (Numpad 0) should also be a square after the fourth step. This shows how the render will look like later.
Finally, we have to setup the render properties. If you don’t want to use any special shaders, we can simply use the Workbench as our render engine (with shaders you would probably want to use Eevee for simple emotes). With the Workbench engine, set the Lighting to Flat and the Color to Texture. In Film, tick transparent. For color management, I recommend Standard for the View Transform, since filmic desaturates the result a lot. Make sure to change the viewport shading to Rendered when using the Workbench render engine (press Z), else you won’t see any textures later.
Warning!
Blender is a very complex piece of software, so it can crash sometimes. Make sure to save often. Furthermore, rarely operations can lead to steps that cannot be undone. It shouldn’t be too much of a problem when doing this tutorial, but it is still good practice to regularly save copies of the current work after major steps. Blender even has an option for it in File > Save Copy.
Import the images into Blender
Background
Now that we prepared the scene, we can import the pictures. Let’s start with the background. Go to File > Import > Images as Planes, and select the background image. Untick Offset planes. Keep the plane dimensions at 1 meter. This basically specifies that 1 meter corresponds to 500 pixels, since our background image is 500x500 pixels, .
After doing so, you might see a grey plane appearing in your scene. To actually view the picture, change the viewport display to rendered preview (Z, make sure the render engine is set to Workbench). If you set the camera properly, you should now see the background image perfectly fit the camera view (Numpad 0). You can also do a quick test render by pressing F12. This should show what you see through the scene camera. Don’t worry too much about any graphical artifacts (like ugly outlines). Since the emote is going to be pretty small (most likely 128px or less). It won’t be noticeable later.
Eyes
Similarly to the background, we also import the eyes, with one difference. Since the eyes are 100x100 in size, they are only 1/5th of the background. Therefore, their height (in plane dimensions) should be 0.2 meters. Doing so will put the eye at the origin again. We can now move it to the correct location by selecting it, and using the move tool on the left side.
Selecting the arrows will move it exactly along the axis. Make sure the Y-coordinate is less than the one of the background, so it appears in front of it when looking through the camera. The distance itself to the camera doesn’t matter, because we are working with an orthographic one.
Any other parts
Repeat the steps in the eyes section with any other parts. Always keep the scale in mind - if it’s 250x250, it’s 0.5 meters, for example.
Some useful keyboard shortcuts:
Gmakes you grab and move an object.G+X,G+Y,G+Zmakes you grab and move an object along an axis. You can also type in numbers after that, to move it precisely. For example,G+Z+0.1moves it 0.1 meter along the Z-Axis.Rmakes you rotate an object. You can also specify the axis and distance like withG.Smakes you scale an object, i.e. change the size. You can also specify the axis and distance like withG.Aselects all objects.Alt+Adeselects all objects. Generally, theAltkey is used in Blender to do the opposite of whatever the initial key did.
Question Mark
Just like the eyes, I add the question mark in front of everything. I rotated it slightly, to make it better fit the background.
Animating the imported planes
Animating the eyes
Now the fun part begins. Let’s begin by making the eyes rotate, which is pretty easy to do.
- Select one eye. Go to the transform properties of the object, and
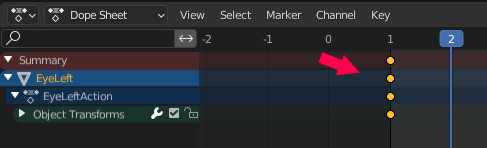
Right Clickon the value ofRotation Y > Insert Keyframe. Now all the rotation values should have a yellowish background. Alternatively, you can also select the eye,Right Click > Insert Keyframe > Rotation. - Check out the dope sheet area. A shape (the keyframe) should have appeared on it. If not, make sure the object is selected, or make sure Only Show Selected is disabled. You can enable it later again.

Right now we only have one rotation value specified. We need a second one, so Blender can interpolate seamlessly between the two. To do so, move the marker to a different frame, e.g. frame 10. Again, select the eye, go to Rotation Y, change it to 360°, and insert keyframe. Now you should have two keyframes in the timeline.
Play the animation by pressing the play button. It should rotate the eye for 10 frames, and then stop.
Maybe we want to rotate the eyes permanently, so it doesn’t stop rotating. We can either repeat the previous steps, so we have a keyframe every 10 frames of our 50 frame animation, or we can use extrapolation, which makes it much easier.
- Change the dope sheet to the Graph Editor, and select the normalize button.
- Remember to still have the eye selected. You should now see two horizontal lines on the graph. One is constant (those are the X and Z rotations we didn’t change), while one should show a steady increase until frame 10. This is our Rotation Y.
- Select this line by selecting a keyframe, go to
Channel > Extrapolation Mode > Make Cyclic. Now you should see the line change to something like a saw, showing a repetition of our changing Y-rotation value.

Play the animation again. You will see that the eye rotates every frame now, instead of only the first 10 frames. However, there are some small problems.
- The animation might be too fast. This is a minor issue. We can simply move the keyframe in the timeline to increase the duration for a whole 360° rotation.
- The animation doesn’t loop perfectly, because there is a small gap in the rotation. This is the tricky part. Currently, it actually takes 9 frames for the eye to rotate 360° (because on the first frame, there is no rotation). To make it rotate perfectly, we can either reduce the length of the animation to 44 frames or increase the duration of the rotation by 1 frame. For this tutorial, we choose the latter option.
If you look at the last frame, the transformation to the next frame (in theory frame 51) should look exactly like from frame 0 to frame 1.
To increase the duration a little, I also changed the last keyframe to frame 26, so it takes 25 frames for a whole rotation. This makes it loop perfectly.
We do the same for the other eye. You can either repeat the steps manually, or press A to select all keyframes of the currently selected object in the timeline, dope sheet or graph editor, and go to Key > Copy Keyframes.
Add a new keyframe to the other eye for Rotation Y, select the keyframe, and go Key > Paste Keyframes. Don’t forget to redo the extrapolation mode for the other eye as well. If you did everything correctly, both eyes should rotate now when playing the animation.
As an optional step, you can also make one of the eyes rotate in a different direction, simply by selecting in frame 26 the corresponding keyframe, replacing the 360° with -360°, and Right Click > Replace Keyframe.
Animating the question marks
I want to show question marks appearing one by one next to each other. Let’s start by animating the first one.
Just like with the eyes, select the question mark again. To make it disappear at first, we have multiple solutions. We can either move it out of the view (changing the position), or change the scale. Changing the scale on any axis to 0 makes the object disappear, so we are going to keyframe this.
- On the first frame of the animation, change the Scale X to 0, and add a keyframe.
- In frame 13, change the Scale X to 1, and add another keyframe. Remember, you can always select objects via the outliner, should they not be visible in the viewport.
If you play the animation, you might notice that Blender tries to interpolate between the two scale values, thus slowly making the question mark appear. This is useful, for example, if you want to make an eye close slowly over time, but it’s not really what we want - it should appear instantly.
If you are in the graph editor, the line will show how it changes over time, to change it, select the first keyframe, Right Click it, and change the interpolation type to constant. Now the scale will constantly stay at 0, until the next keyframe changes it to 1.
It would also look better if the question mark disappeared sooner, so select it again, and create a keyframe for Scale X to 0 at frame 39. Again, we need to change the interpolation type of the second keyframe to constant.
To add the other question marks, simply duplicate the existing one. This saves time, because we don’t have to animate everything again. Select the existing question mark, and press Shift + D to duplicate it. Add two new question marks, and place them next to each other.
Finally, we want to not make them appear and disappear at the same time. For this, simply move the keyframes on the dope sheet. Select the second question mark, make sure only show selected is active , press A, press G, and move it over 6 frames. Do the same with the third question mark, but move it 12 frames instead. Every question mark should have a different offset now.
You might also want to add a fade-in and fade-out, however, this requires changing the transparency of the object. To do so, you would need to add a shader, which would go beyond the scope of this tutorial. Also, keep in mind that .gif does not support transparency values other than 0 and 1 (semi-transparency), so you would need to use another format.
Animating the background
Let’s start with the most difficult part: Making the bird sway slightly from left to right. You could already do this by either moving the camera from left to right slightly or rotating the whole bird. That doesn’t look right though, because when we sway from left to right, we stretch and compress our body. We want to do the same with the bird.
For this, we finally get to the part for which Blender was made initially: creating (modelling) meshes. Until now, we basically just moved around some objects, and changed general properties. What if we want to, say, stretch only certain parts for it? Thankfully, Blender provides a lot of tools to make such a task relatively easy - if you know that they exist.
The first concept we need to learn are modifiers. Modifiers change an object non-destructively. Think of them like “masking layers” from other programs. We can always easily disable or remove them, without having permanently altered the object.
First, add a SimpleDeform modifier to the background, by selecting the background and going to modifier properties. You should immediately see a change in the object, since it will look slightly warped now. This is obviously not what we want.
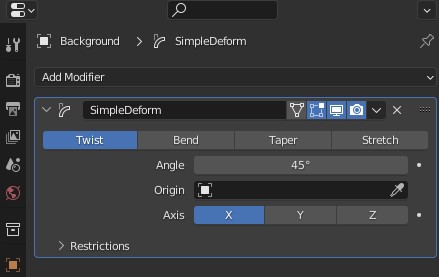
Change the type to Bend, since we want to bend the body. Furthermore, change the axis to the Y-axis, because this is the axis we want to bend the bird around. However, if you change the angle now, nothing happens. That’s because Blender doesn’t know how it should bend the four vertices and it has no origin. We need to change some things first.
Preparing the mesh of the background
Before the deform modifier works, we need to adjust the mesh of the background. Here are some terms you should know:
- A vertex (plural vertices) is a 3D point in space.
- An edge are two connected vertices.
- A mesh is a collection of vertices, which are connected via edges. They represent our final model.
- Each mesh has materials. They represent basically the surface, and can be used to texture the mesh (using UV maps). This also means that if we change the mesh without changing the UV map in Blender, it will automatically stretch and fit the texture so it fits on the mesh.
When we initially added the pictures, you might remember that we added them as planes. They are the simplest form of mesh, consisting of four vertices, one in each corner.
So, how do we let the bird sway? Think of the background like a piece of paper. If you put it on a flat surface and you move two corners together, you will notice that the whole paper warps in a 3D space. It bulges outward, so the two corners can join together. Can we avoid this?
The solution is simple: Fold the paper multiple times along the edge connecting the two corners, like an accordion. Now, if you make sure the paper stays mostly flat, the two corners can join each other when you push them together, without the paper warping as much.
For our mesh, we want to do something quite similar.
- Make sure you selected the background and the modifier is either disabled or the angle at 0°.
- Either change the object mode on the top left to Edit Mode, or simply press
Tab.

A whole other world opens up. You might notice that we have quite a lot of tools on the left side. Thankfully, we don’t need most of them for what we are doing. You might also notice that by default, all vertices are selected (if not, press A). You can also select single vertices by clicking of them in the corner. If you press G now, you can move them around, and also see how the texture stretches when you don’t move all vertices at once.
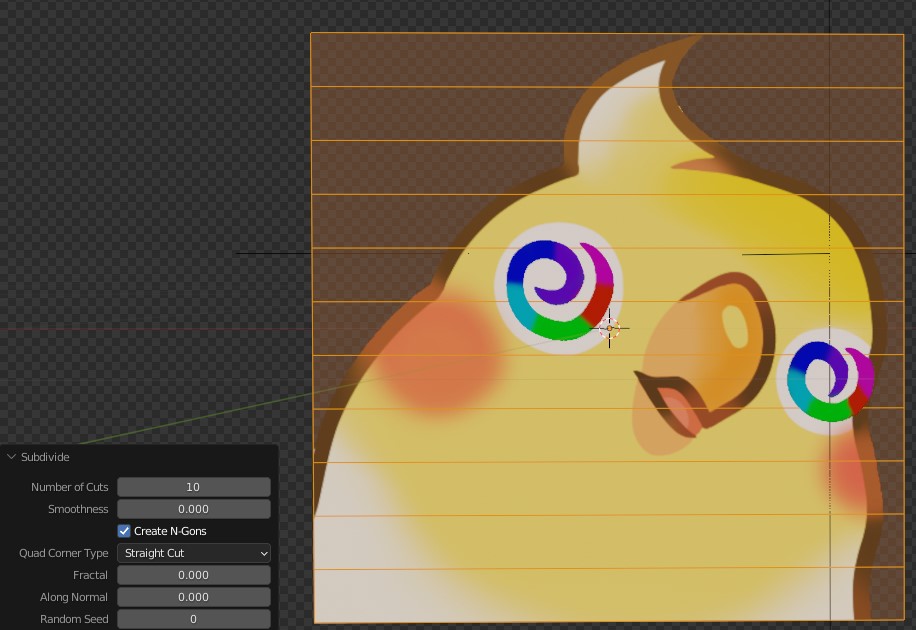
So, how do we make an “accordion-like” structure? First, we need to select the edges on the side. To do so, switch to edge mode next to the operation selection mode.

Make sure you don’t have anything selected (Alt + A). Now, select the left and right edge, by either click and dragging a selection box over them, or selecting one edge and selecting the other with Shift.
Time for a subdivide, one of the most common tools in Blender! Right Click while still having the two edges selected and choose Subdivide. A small panel should open in the bottom left. Change the number of cuts to 10 and hit Enter. Perfect!
Setting up the simple deform modifier
We finally can use the modifier. First, change back to the Object Mode. Now, if you change the angle… nothing happens. That’s because we also still need to apply an origin - which determines where Blender should bend the object around. In the properties of the modifier, it is currently empty, but it expects another object.
Thankfully, blender provides another easy solution for this: empty objects. Those are basically objects without any vertices, which are not rendered to the final output. They have many use-cases and one of them is this modifier. Press Shift + A (or use the Add menu on the top left), and select Empty > Plain axes. Go to the modifier of the background again, click the eyedropper next to the origin input, and select the Empty object in your viewport or outliner.
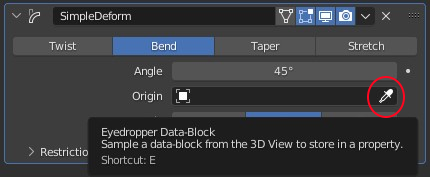
If you change the angle now, you should see the bird bend around this empty object.
Of course, this is not perfect yet. We only want to bend the top part, not the bottom part. We can do this by adding a restriction to the deform modifier: a vertex group.
Go back into the edit mode. Select all the edges but the two lowest ones. If you go into vertex selection mode, you should also see all vertices selected, besides the bottom four ones. Go to object data properties, and press the + symbol to add a new group. With the vertices selected, as well as the group highlighted in the list, press Assign. Now, if you deselect everything (Alt + A), and press the select button of the vertex group, you should again see all vertices selected besides the bottom four ones.
Go back to the modifier and in Restrictions select the vertex group we just created. If you change the angle now, you should see that everything bends besides the bottom of the background. Closer to what we want, but still not perfect.
You might notice that the bend is kinda akward. That’s because the position of the origin is still at the center of the background. If you move the Empty object down, to the part where the mesh doesn’t move (Select Empty, G, Z), you should see that the bend looks much better. You might also want to move the Empty object slightly to the right, because that’s where logically the center of mass of the bird is, according to the picture at least.
Animating the simple deform modifier
Just like we did previously with the position and scale, we can now animate the angle.
- Go to the dope sheet, make sure the first frame is selected.
- Set the angle of the modifier to -10° and insert a keyframe.
- Go to frame 26 (or center frame of your animation).
- Set the angle of the modifier to 10° and insert a new keyframe.
Tip: since the emotes are going to be quite small, especially when embedded in text, it’s better to exaggerate the animations a little - else the animation will be barely noticeable.
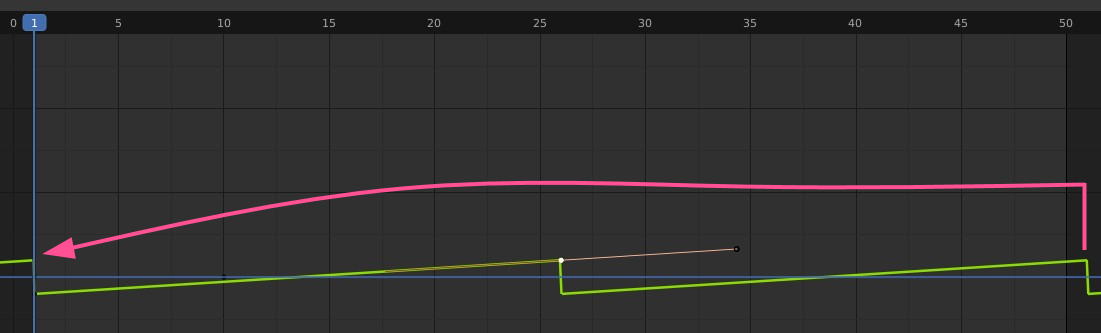
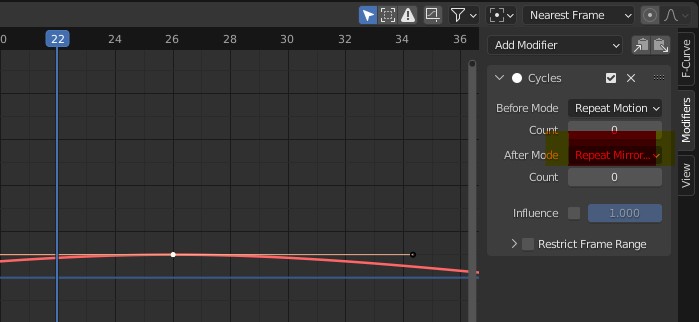
Go to graph editor, select the second keyframe, and add a cyclic extrapolation. It should loop now in the animation, but not quite right. When selecting the second keyframe, set the After Mode property to Repeat Mirrored. The bird should sway back and forth now, however, the change of direction might be kind of abrupt. This is because by default, Blender uses linear interpolation. To fix this, select the first keyframe and change interpolation mode to Bezier. This also allows you to customize the ramp up and ramp down by moving the handles.
Tip: Organic animations usually follow a Bezier curve. Use linear (or constant) for robotic ones.
Making the eyes move with the modifier
You might have noticed another problem by now - the background moves independent of the eyes. How can we connect them together?
The best solution is to link the eyes to vertices of the background. To do so, we need to add them first, though.
- Select the background.
- Go to edit mode and edge selection mode.
- Select the horizontal edge that is closest to the center of the left eye.
- Press
G+G. This allows you to move the edge up and down. Move it so it’s very close to the center of the eye.
Do the same for the other eye. If there’s too large of a gap between two edges now, simply select the two vertical edges connecting them and subdivide them once.
Now, select one of the edges that is at the center of the eye, and subdivide it once. If you go into vertex selection mode, you should see that there’s a single vertex on the edge now. If you can’t see them, because it’s behind the eye, click on the eye symbol of the eyes in the outliner to hide them.
Select the vertex, press G + G, and move it so it’s close to the center of the eye. Repeat with the other eye.
Now, we can finally link the eyes to the vertices we just created!
- Go to object mode, select the left eye, and
Shiftselect the background. - Go into edit mode, so you see the vertices of the background again.
- Select the vertex corresponding to the eye, and press
Ctrl + P > Make vertex parent. - Repeat with the other eye. The eyes should now be part of the Background in the outliner (simply extend the hierarchy of the background to see them).
Play the animation again, and you should see the eyes now move with the sway! Perfect!
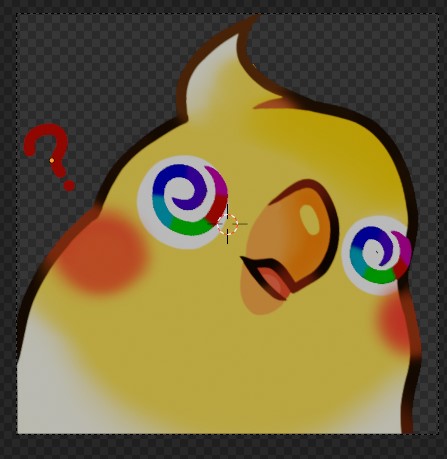
The animation itself is finished now. You can change the values how you want of course, but at the end you should have something similar looking like this:
Rendering
We can render the animation! Blender renders each frame as a separate picture, so you might want to select the folder it should save to. Simply go to the output properties, and select the destination folder. By default, it is the tmp folder of your root drive (e.g. C:).
Press Ctrl + F12, and you should see Blender render all the pictures. Check your output folder if they are all there.
You might also want to change the exposure (brightness) or gamma of the picture, as well as contrast (Look). You can do this in the Color Management menu in the render properties, where you also selected the render engine. Make sure you also selected Standard in the View Transform of the Color Management.
The last step might require some trial and error until you are happy. I used for exposure 0.2 and gamma 0.6 with medium contrast.
When you are happy with the result: This is it! We are done with Blender.
Other things you could animate in Blender
There are many, many more possibilities with Blender. For those, I recommend to take a look at other tutorials, like from BlenderGuru.
Here are some other emote ideas you can learn and do with Blender:
- Keep in mind you can also animate the camera position! This is useful if you want to add something like a shake to the whole picture.

- Particle systems are useful for lots of small effects, like confetti, though they are difficult to loop. In the following emote, the particle system was used to animate the sweat drops. The blinking eyes are created by simply changing the scale of them (and maybe rotating them slightly) for one frame.

- Shaders can be used to procedurally generate graphics. This emote uses a procedural generated background, that also loops perfectly.

- Of course, with Blender you have the power of physics! The next emote was made for the channel COFindus. Check him out and tell him that Roadhog is F-tier.

Gimp
As a small final step, we want to create a .gif out of the single pictures. For this, I recommend Gimp.
- Create a new project, and set the resolution to the size of your background image (e.g. 500x500). A white background appears.
- Select all the rendered pictures in your output folder, and drag them into Gimp to the layers after the background. This operation might take a while, you should slowly see each picture being added as a layer.
- Delete the background after adding the pictures.
- Sadly, Gimp added the pictures in the wrong order (you will notice when you export it as a gif). To fix this, go to
Layer > Stack > Reverse Layer Order. Now the first picture should be at the bottom of the layer view. - You might also want to change the size - to decrease the file size, and to allow the upload to certain platforms like Discord, which uses resolutions like 108x108. To do so, go to
Image > Scale Imageand set it to 108x108.
Export the picture as a .gif by going to File > Export, and changing the extension to .gif. Clicking Export should open a new window, where you can select some options.
Make sure to tick As animation, as well as Loop forever. Here you can set the speed of the animation - I recommend a value of 40 ms. Set frame disposal to One frame per layer (replace), and tick both Use delay entered above for all frames as well as Use disposal entered above for all frames.
This is the final result, our finished emote:

You can also re-import the .gif into Gimp again. Each layer has the number of milliseconds in its name. If you change the number, you can change the duration of specific frames in the .gif. Remember to untick Use delay entered above for all frames when exporting.
That is all. Take care.
Enable Disqus comments